Many WordPress users probably have problems uploading large images. They receive an error message stating that the file itself exceeds the file size limit. There are several reasons for this limitation.
In this post, we'll introduce you to four tried and tested methods you can use to edit your WordPress upload limit. You will also learn how you can easily upload larger files without any difficulties.
How to Check Your Current WordPress Maximum Upload Size
Before you start with the actual change, it is good to see the maximum upload size on your WordPress site at the moment. There is a quick and easy way to check this in the WordPress admin panel → Tools → Site Health. After loading this page, select the "Info" tab and the "Server" submenu.

If you expand this menu, you will find a whole range of information about the server environment. For the topic of this material, we need 2 of the numerous values, namely:
- "Upload max filesize"
- "PHP Post max size"

As you can see, both values are set to 64M, which means 64MB. This can be defined as a relatively high limit, and yet in some cases, it is not enough.
How to Increase WordPress Upload Limit
The limit can be changed on several levels. For this reason, we will show you several ways of performing this action below.
1. Modifying .htaccess File
To access this file, you need some kind of file manager. In this material we will use the one from cPanel, but an FTP client like FileZilla can be considered as an alternative.
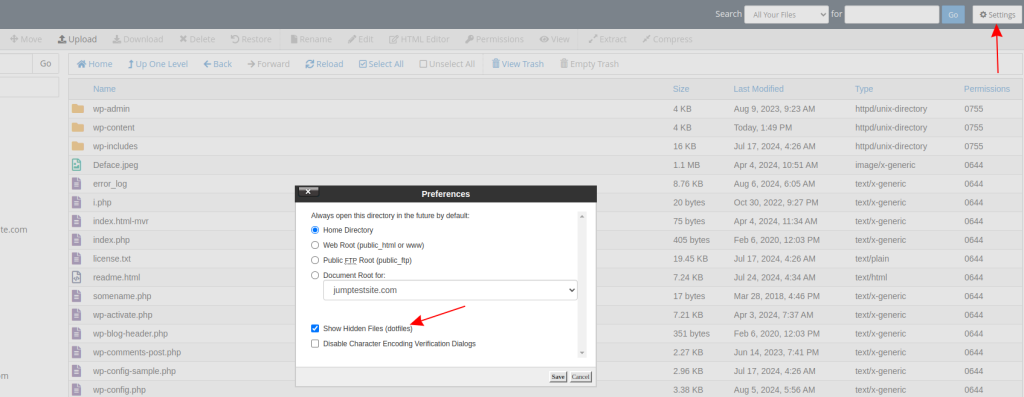
cPanel → File manager → Access the directory of your website, and there you will find the .htaccess file in question.
IMPORTANT!!! As the file itself begins with “.”, it is hidden. You must allow this type of file to be seen:

Then right-click on the “.htaccess” file → Edit
At the beginning of the file, you must insert the following 2 lines:
php_value upload_max_filesize 256M
php_value post_max_size 256M
This is what the final result should look like:

The change will take effect as soon as you save the file. You can check the change by calling up the menu Admin Panel→ Tools → Site Health → Info → Server again.
2. Use cPanel Change PHP Options
Another way to increase the maximum upload file size in WordPress is by editing the values directly in cPanel. Many providers, such as Hosting Jump, offer this option..
To do this, go to "Select PHP version" after opening the control panel:

Then click the “Options” button

and then change the values for:
post_max_size
upload_max_filesize

You can also check this via the administration panel →Tools → Site Health → Info →Server menu.
3. Changing the Upload Limit via the WordPress website
We would like to point out that the method described below does not actually change the upload limit. WordPress, or at least its core, takes this value dynamically from the PHP settings of the server itself.
In practice, however, we have found that particular WordPress plugins or themes do not recognize the change made in the php.ini file directly after an update, and an additional action is required, namely:
Using the cPanel file manager or via FTP, you need to edit the “wp-config.php” file, which is located in the root directory of your website. Insert there:
@ini_set('upload_max_size' , '256M' );
@ini_set('post_max_size' , '256M' );
4. Upload Files via FTP/SFTP
It is important to mention that the above options have their limitations, which is quite normal. Especially in terms of security, it is quite possible that you either cannot change the default upload limit or that changes that are specific to the hosting environment are required.
Also, the WordPress menu is more for uploading images. If a larger file needs to be uploaded, it is always recommended to use FTP. For such actions performed with FTP, there is actually no limit, or it is the disk quota itself. There is also no limit to the file extension that can be uploaded. For this reason, we will also describe this option here.
Before you start, you must have the following:
- FTP client
- Input data
We recommend using FileZilla, but you can also use another client. For the logins, use the ones for cPanel. Usually, you get them when you create an account yourself, but if you haven't saved them, you can contact us for more information.
When you establish a connection, enter:
- Host: The name of the server on which your account is located
- Username: The username for cPanel
- Password: The password for cPanel
- Connection: 21
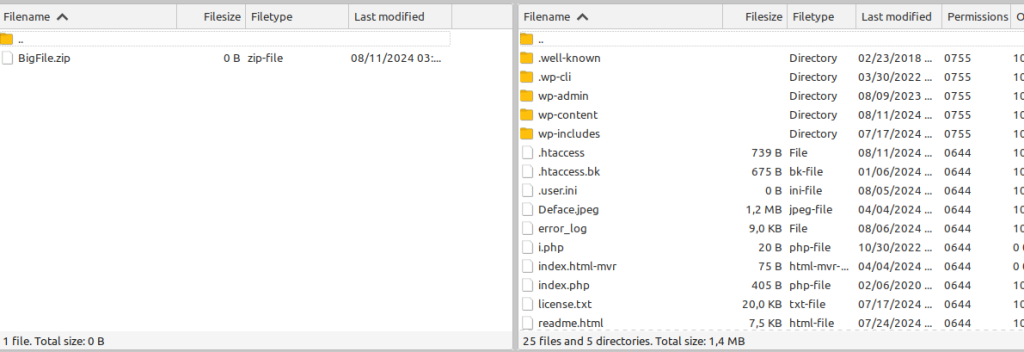
After successfully logging in, you need to navigate to your WordPress website in the right-hand window where you want to upload large file. In our case, this is the “public_html” directory.
In the left-hand window, navigate to the directory where the file or group of files you want to upload is located. We will upload “BigFile.zip”.

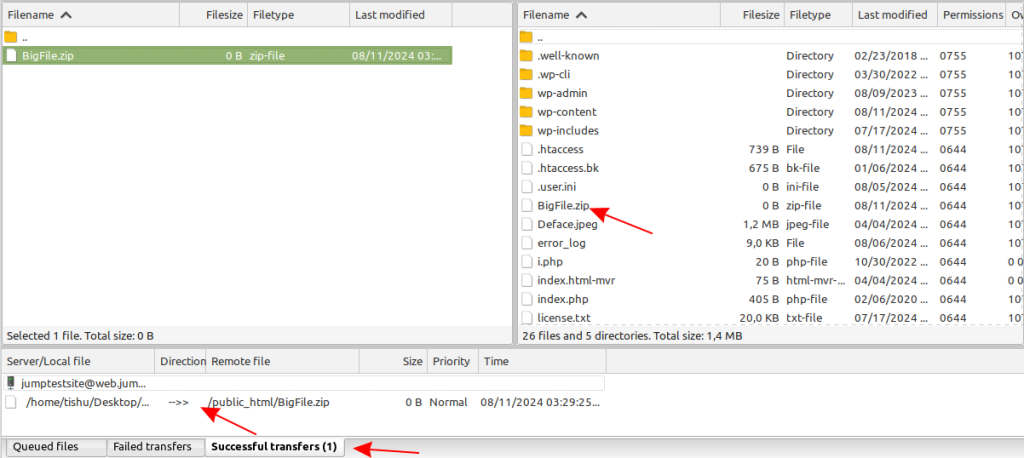
Right-click on BigFile.zip and select the “Upload” option. You can also upload a group of files in this way.
After a successful transfer, the file will be uploaded from your local drive to the server environment:

File upload via the cPanel file manager
As an alternative to FTP, you can also use the file manager in your hosting control panel. In this case, we use cPanel, which has an integrated file manager.
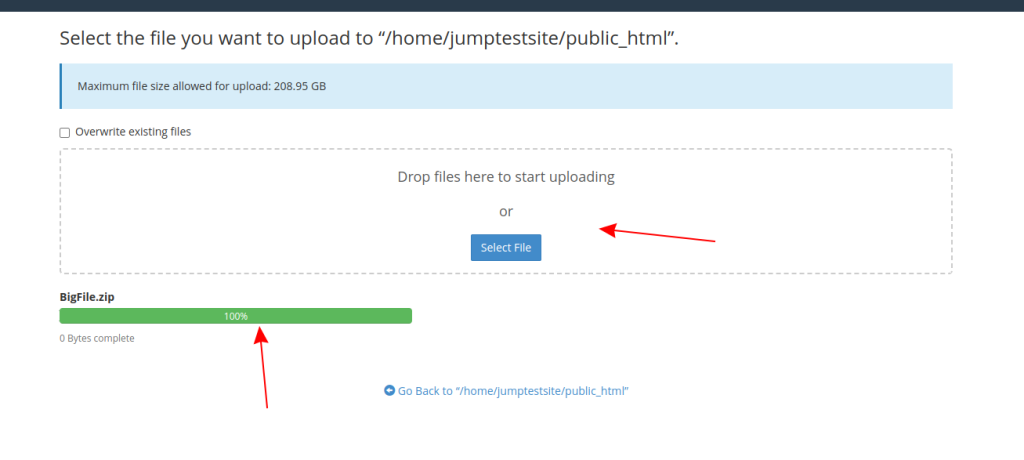
Once you have accessed it, open the directory of your WordPress website again. In the top navigation, you will also find the "Upload" button, which you can use to upload a file or a group of files. For testing, we will use our “BigFile.zip” again.

Looking for a Reliable Hosting Provider With Expert WordPress Support? Hosting Jump Is the Perfect Choice
If you are looking for a profiled hosting plan for WordPress, you can buy it at Hosting Jump. Our WordPress hosting plans are optimized for the needs of WordPress and have significantly more CPU and RAM than our standard shared hosting plans. Our LiteSpeed server offers perfect caching, and in combination with the built-in WordPress module, your website will load lightning fast and with a minimum of resources.

We also offer WP support - professional support for a WordPress website or WooCommerce store, including plugin settings, monitoring, updating WordPress core, PHP settings, help with the admin panel, etc. Our experts have more than 10 years of experience with the WordPress platform; they can take care of your website and assist you in crisis situations.
Conclusion
In summary, it's often necessary to find ways to increase the maximum upload size in WordPress to accommodate larger files. Especially with the advancement of technology, the images we take with our cell phones are very large (in the order of several MB), and to upload such an image, you often need to increase the limit.
Note that we also do NOT recommend exceeding the allowed file size. A value of around 64 MB is completely sufficient.
If you need to upload large files, you can use FTP, as we have indicated in some of the examples.
If you have any questions or difficulties, contact us via the chat on the website or by email at support@hostingjump.com. Our experts are always ready to help you and assist you with care and attention.
FAQ
Is there a maximum upload size limit for WordPress multisite installations?
Yes, there is a maximum upload size limit for WordPress multisite networks. This limit can be set individually for each site in the network, and it can be adjusted by an administrator through network settings or by modifying server configurations.
What is the functions.php file, and how can it help me increase the upload limit?
The functions.php file is a theme file used in WordPress where you can add custom functions. You can add specific code to this file to increase the maximum file upload size for your WordPress site.
If I increase the maximum upload size, will it affect my WordPress site's performance?
Increasing the maximum upload size may impact your WordPress site's performance if the server resources are limited. It's essential to monitor your site's performance after making changes to ensure it runs smoothly.
How can I increase the maximum file upload size limit through the WordPress dashboard?
You cannot directly increase the upload size limit through the dashboard of your WordPress site itself. However, you can find the current limit displayed there and then use methods such as editing the php.ini file or contacting your hosting provider to increase the limit.
What should I do if the file upload size in WordPress is not increasing after multiple attempts?
If the maximum upload file size in WordPress is still not increasing after trying various methods, ensure you have cleared your cache and checked for any server-level restrictions. Additionally, reaching out to your hosting provider can provide insights on how to increase the upload limit in WordPress and help resolve the issue.

