Adding a domain name to Google, Facebook and other websites often requires verification, which can be done quickly and easily via a DNS TXT record.
In this article, we will show you which actions are required for this purpose.
Where Are DNS Records Managed?
First of all, you need to know exactly where your DNS records are managed from.
The most important options are:
- Via the control panel of your hosting account. For example, cPanel.
- Via the DNS manager in your customer zone.
- From an external manager such as CloudFlare.
- From a domain registrar.
Guidelines that will make it easier for you to navigate:
- If you have a shared hosting account and a domain name, the records are most likely managed by cPanel.
- If you only have a domain name without a hosting account, then use an external DNS zone (CloudFlare, another provider or our DNS manager in the customer zone).
Creating a DNS Txt Record
Let's also look at how to create a DNS TXT record, depending on where the DNS records are managed for the specific domain name you need verification for.
From cPanel
After you have logged in to the Control Panel, open the "DNS Editor/Zone Editor" menu. There you can monitor all domain names that have been added to your account. From here, select the “Manage” button available for each domain name.
After you have performed this action, you will be redirected to a new page with the DNS records for the selected name.
The "Add record" button is located on the right-hand side. If you click on it, several fields will appear in the middle window that you need to fill in, namely:
- Name - Enter your domain name here. If you are using a subdomain, for example store.domain.com, enter this.
- TTL - Leave the value as default.
- Type - Select TXT.
- Record - Enter the value you received from Google, Facebook or another provider.
You should save the settings using the "Save Record" button. The following illustration shows an example view of the completed fields:

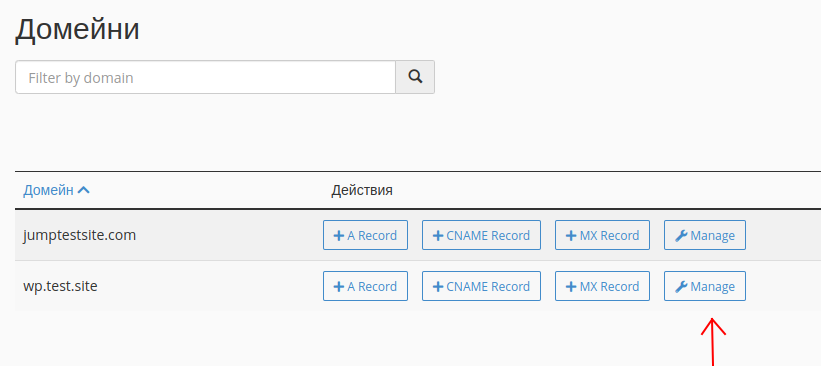
DNS Manager in the Client Area
If you would like to create the record via the DNS manager provided by us, you must access your customer area and call up the "Domains" / "My domains" menu. There you will find your domain names and the settings for each one under "DNS Management".
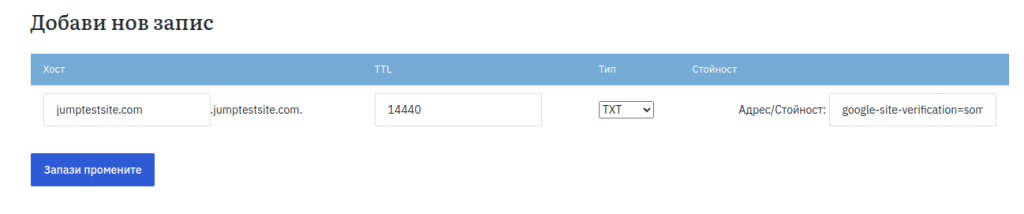
From here you can manage the available records for a particular domain and at the bottom of the page there is a field to add a new record. The syntax is identical to the one above (for cPanel). We also attach an image:
Using an external DNS provider
If you use an external provider such as CloudFlare or a domain registrar, you must consult the known documentation of this provider. The procedure for creating the required record should be described there.
Need to rename your WP domain? Read this article on how to change a WordPress domain name.

We hope that we have been useful to you. If you would like to receive further useful information, news and current promotions from us, please subscribe to our newsletter: