We have a blog post focused on the advantages of the LiteSpeed server. Thanks to its built-in cache, it offers considerable optimization of the loading speed for every website.
In this article, we want to continue the topic and show you how to achieve excellent results with a few simple settings and a single WordPress module. Of course, we haven't neglected to carry out tests and show you the difference in practice.

Change the PHP Version Before Starting the Optimization
One of the most important things to consider before any other settings is the PHP version we are using. PHP version 7.0 is officially declared stable and has been used by anyone since December 3, 2015.
WordPress version 4.1.9 was released on January 6, 2016, and now also officially supports PHP 7.0. In addition to many syntactical changes, PHP 7 also has fundamental changes and improvements at its core. This leads to a significant acceleration and responsiveness of websites running on PHP 7.
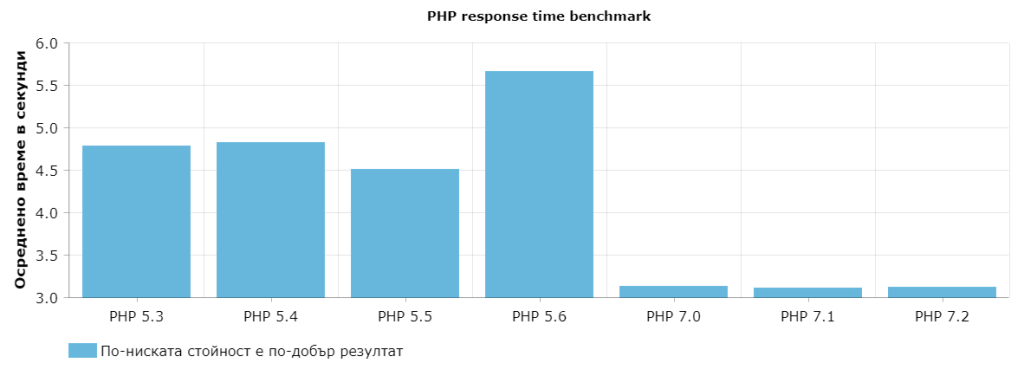
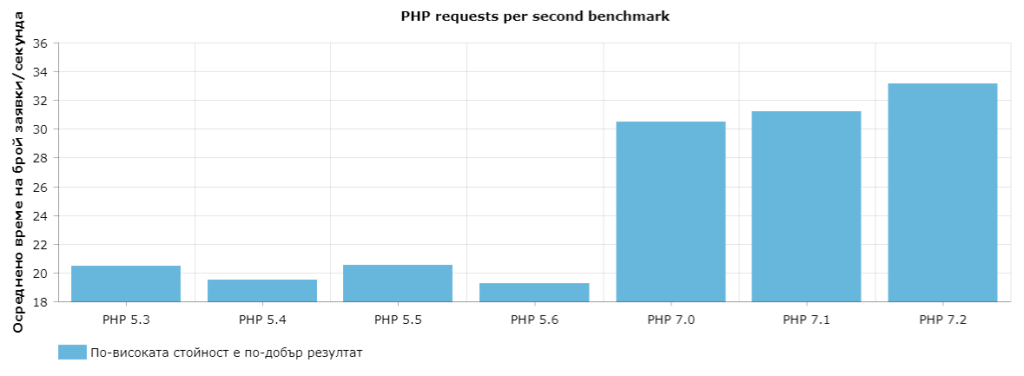
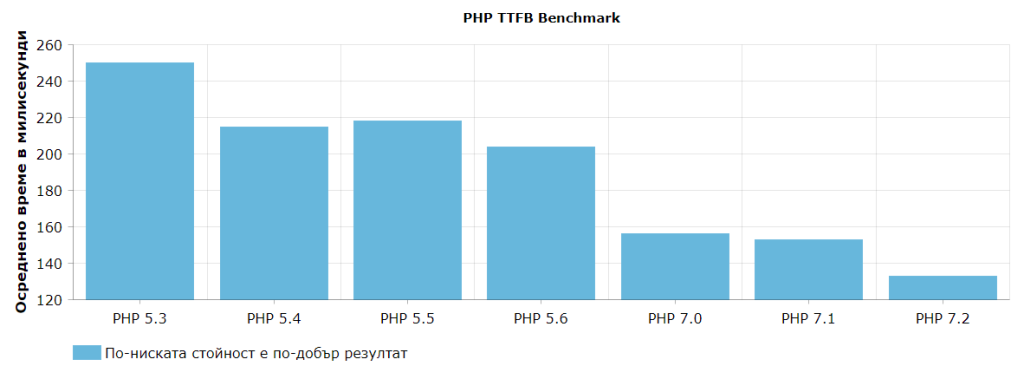
We have conducted a series of tests comparing the most commonly used PHP versions today. For the test, we installed the latest WordPress version 4.9.4 on our optimized WordPress "Blogger Start" package and used PHP versions 5.3, 5.4, 5.5, 5.6, 7.0, 7.1, and 7.2 without additional extensions (including caching). We simulated with 5 concurrent users and 100 competing (concurrent) links visiting the same article on our WordPress website.
- In test 1, we measure the response times of the different PHP versions. The tests clearly show that the average response time for PHP 5.3 to PHP 5.6 is around 4.75 seconds. For PHP 7.0 to PHP 7.2, the time is 3.10 seconds. This is a significant increase of 42.03% compared to PHP version 5.x.
- In our next test, we measure the number of requests per second that can be processed by PHP. Here we can see that the number of requests per second in the PHP 5.x versions has an average value of 21, and in PHP 7.x the number is 32. This is again a large increase of 41.5%
- In our last test, we want to measure the time to first byte (TTFB). This is the time required by the web server itself to process the first request and send packets to the user's browser. Here, too, there are considerable differences between the PHP 5.x and PHP 7.x versions. Here we see an increase of 37.83% compared to the old PHP 5.x versions.
Are you probably wondering how you can change your PHP version? You can do this with a few clicks via your cPanel account. You can read more about this in our technical documentation.
Why Should We Use the WordPress Module if We Already Have LiteSpeed?
In contrast to other web servers such as Apache and Nginx, LiteSpeed as a web server offers significant acceleration of the website, lower resource consumption, and more extras. Here's our detailed comparison of LiteSpeed vs Nginx and Litespeed vs Apache.
However, since we already use LiteSpeed in our hosting solutions, why do you need to install an additional WordPress plugin? LiteSpeed itself has an integrated cache that is divided into two levels: public and private.
It is important to note that the plugin communicates directly with the web server to operate both types of caching much more efficiently than other caching plugins that operate at the PHP level (opcode) or are stored on disk. The public cache is accessible to everyone.
This type of cache is primarily used for caching requests that do not contain sensitive information. The private cache type is used for resources that are divided according to individual users, i.e. only the user can access their cached information.
This type of cache is used in two cases: for caching users who have registered on your WordPress website or when a visitor writes a comment on a post. These options in the LiteSpeed Cache plugin are enabled by default, but you have control over them and can turn them off.
The conclusion from what has been said so far is that the LiteSpeed Cache plugin must be activated for caching and communication with the webserver to function fully and efficiently. Furthermore, the caching process is automated, and all you need to do is install the plugin, activate it, and set it up according to your needs.
Differences Between Different Caching Plugins
Many users use other caching plugins that can also contribute to the speed of their websites and lower resource consumption. As mentioned above, the LiteSpeed Cache plugin communicates directly with the LiteSpeed web server to increase the speed of WordPress.
Caching is a fully automated process in which certain requests are cached in the LiteSpeed web server's memory. When a user then requests a cached resource, that resource is served directly from this memory, bypassing PHP and the database.
This is important because if every request is processed by PHP and information is retrieved from the database, this is significantly slower.
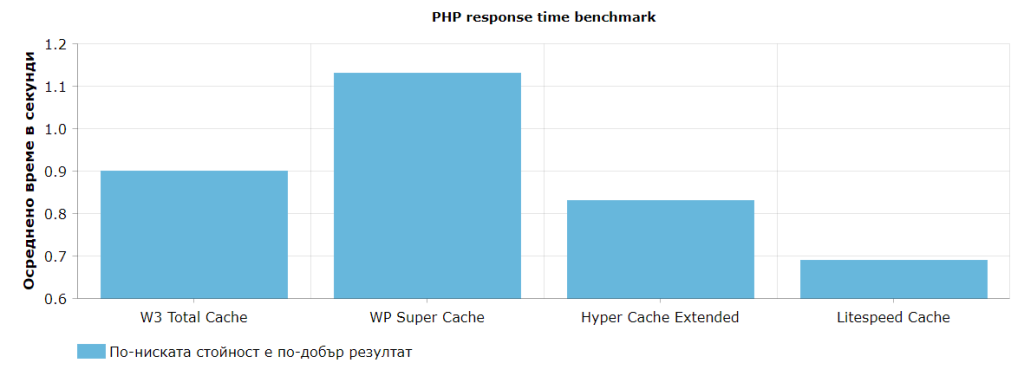
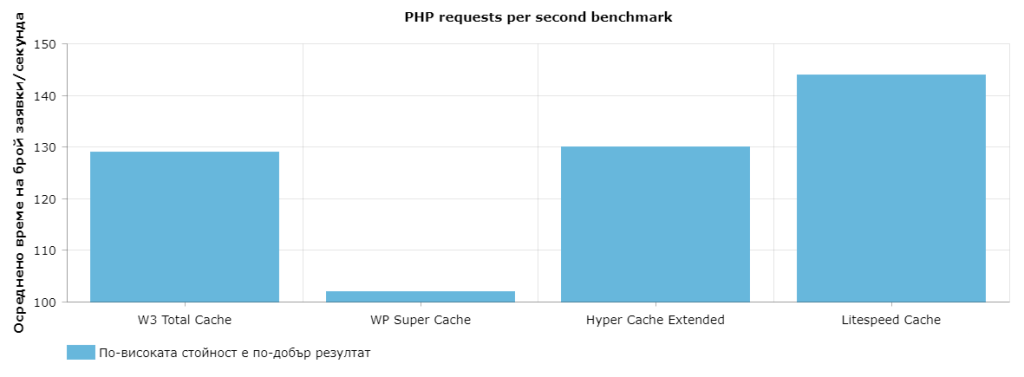
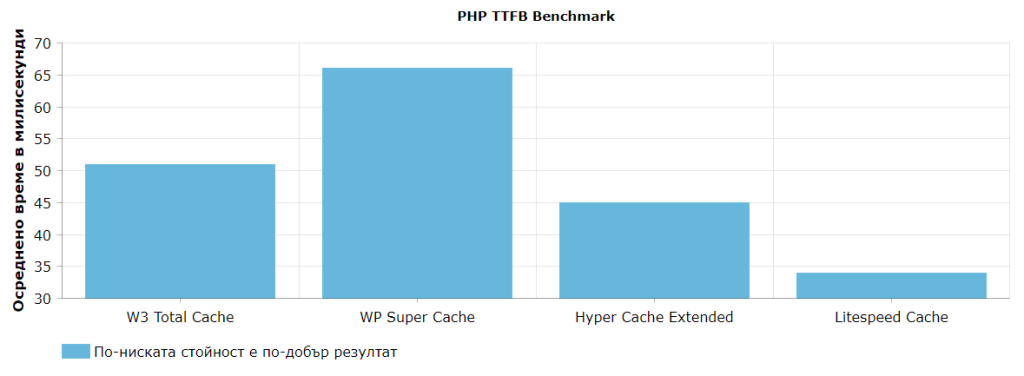
We have prepared tests between various popular caching plugins and LiteSpeed Cache. We used the plugins W3 Total Cache, WP Super Cache, Hyper Cache Extended, and LiteSpeed Cache.
All plugins are preconfigured with their optimal settings. We tested the same random article in WordPress 4.9.4, running PHP 7.0. 3 tests were performed, and the results were averaged.
- In test 1 we measure the response time of PHP again. LiteSpeed Cache delivers the best results with a response time of 0.693 seconds, while WP Super Cache achieves the worst result with 1.113 seconds.
- In test 2, we will measure the maximum number of requests per second that can be executed. Again, we see a clear lead for LiteSpeed Cache with 144 requests per second, while WP Super Cache lags with 101 requests per second.
- The last third test concerns the response time of the web server (Time To First Byte). The LiteSpeed Cache plugin achieves a response time of 34 milliseconds and WP Super Cache 66.
Although the differences in terms of values are not very large, as they are measured in milliseconds, this can have a significant impact if there is a higher volume of traffic to a website.
There is another factor: as the number of visits increases, the response time and TTFB increase, while the throughput (requests per second) decreases. This is because there is always a limiting factor, be it PHP memory allocation or physical server resources.
It follows that we should always strive for better performance in the above factors.
Functionality, advantages, benefits and Options of the LiteSpeed Cache Plugin
As we have already seen, LiteSpeed Cache is a serious contender when it comes to caching plugins. It is important to know that this plugin works independently. This means that it is not necessary to install other caching plugins.
Just one installed and active LiteSpeed Cache plugin is enough to achieve lightning-fast results on your WordPress websites. The plugin essentially has two main functions: a full cache for pages, which are usually dynamically generated, and a comprehensive optimizer for the WordPress website itself.
By default, the options needed for most websites are active, and no further settings are required on your part. Here, we will discuss some of the most important and interesting settings that the plugin offers.
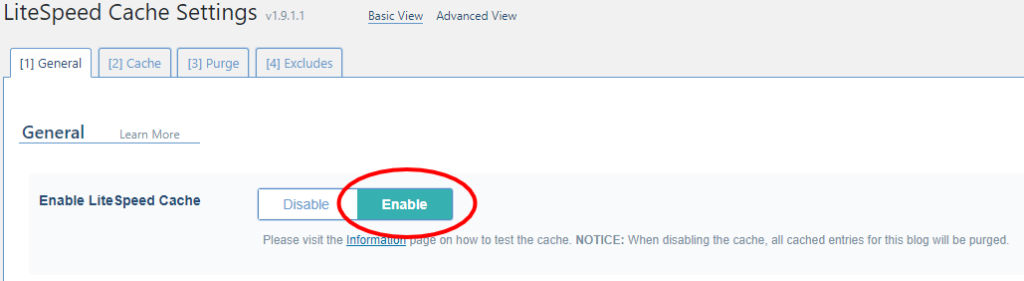
- Activate caching: By default, caching is already active when the plugin is activated. You have control over this option in General -> Enable LiteSpeed Cache.
- General -> Default Public Cache TTL - How long the public cache should be kept. Default value - 168 hours, it is recommended to leave this value as it is.
- General -> Default Private Cache TTL - How long the private cache should be kept. Default value: 30 minutes. Here too, we recommend leaving this value unchanged. The private and public cache is automatically updated when you, e.g. publish a new message, update an old one, make changes to your website, etc.
- General -> Default TTL for the start page - How long the main page is cached. Default value - 168 hours.
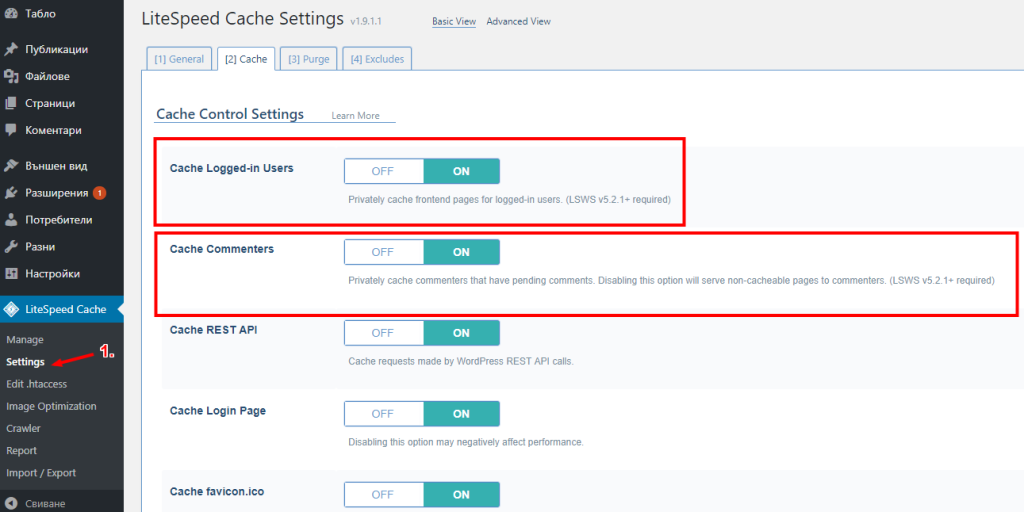
- Cache -> Cache Logged-in users - Cache content for authenticated users of the website.
- Cache -> Cache Commenters - Cache content for people who comment on the website.
- Cache -> Cache REST API - Cache requests from the integrated WordPress REST API.
- Cache -> Cache Login page - Cache of the login page. We recommend that you leave all these options activated.
- Cache -> Cache Mobile - Activate this option if you plan to offer your website in a version optimized for mobile devices. It is not activated by default.
- Tab Purge - Control over the cache and the possibility to delete it manually.
- Exclusions tab - control over what can and cannot be cached. You have the option of excluding various parts of your website from caching.
- Image optimization: At this stage, this option is still experimental. If you activate this option, your currently uploaded images will be automatically sent to LiteSpeed's external servers for further processing and optimization. This process may take some time. The option will not cause any damage if you activate it, but prepare yourself with patience if you have a large number of images.
Comparison of the LiteSpeed cache plugin Under Real Conditions
If you have followed the previous guidelines, you should notice a significant improvement in the loading speed of your website. As mentioned above, the first thing you need to pay attention to is your PHP version.
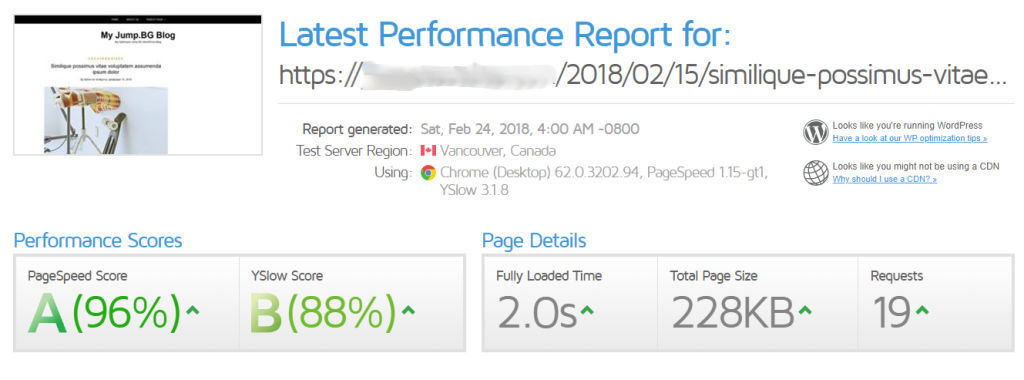
We ran two different tests: one with WordPress and PHP 5.6, and one without LiteSpeed Cache enabled. The other test is with WordPress, PHP 7.0, and PHP cache enabled. We used an external and popular test website from a remote and independent location: GTmetrix.com. These tests indicate the results you can expect:
- Test 1: PHP 5.6 and LiteSpeed cache deactivated. We observe a loading time of 2 seconds:
- Test 2: PHP 7.0 and LiteSpeed Cache are activated. Here we see a loading time of 1.6 seconds:

It is important to mention that the tested website has an SSL certificate enabled, which also contributes to the excellent results of GTMetrix. The SSL certificate is free for all WordPress hosting plans as well as for the other shared hosting plans.
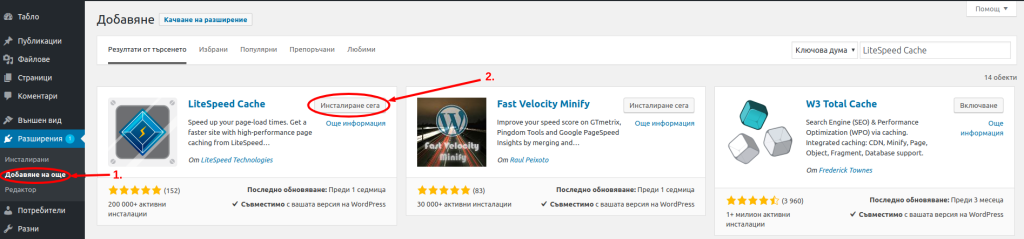
Installation of WordPress LiteSpeed Cache Plugin
Installing the LiteSpeed Cache WordPress plugin requires nothing more than opening your WordPress admin panel, installing the plugin, and activating it. As mentioned, the default settings are sufficient and optimal for most WordPress sites.
How to make sure the plugin works
There are other tests for people who are a little more familiar with how web servers work. Of course, we are happy to teach you something new, even if you are not familiar with how web servers work.
Our goal is to show you how to run your tests to make sure the plugin works correctly. Why do we need this? Because the plugin relies on rules in your .htaccess file, and if there are other, previous rules, these may interfere with correct operation.
You may also have another caching plugin that you have forgotten to activate. As you can see, there can be many reasons for this. For this reason, we need to make sure that everything is in order after installing and activating LiteSpeed Cache.
For this, we will use the developer console in any browser. For our tests, we will use Google Chrome, but all other modern browsers have similar features. To activate the developer console, open a new tab in your browser without loading anything, press F12, which will open the console, and once the plugin is configured to your liking, visit your website.
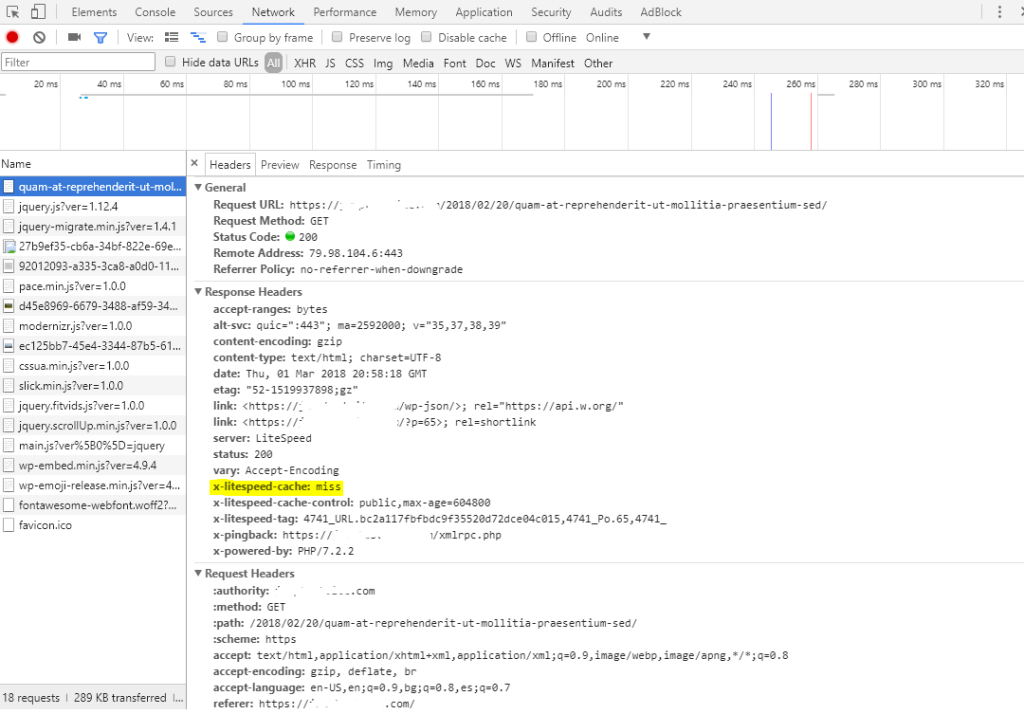
In the console, go to the Network tab and select your website from the left-hand menu. The aim is to recognize what response the web server returns to us (response header). When the website is loaded for the first time by any user, the content is not cached. This can be understood as follows:
- The server response or the response headers must have the status 200 OK. This status means that the website is loaded normally and delivered directly from the server.
- The response should display x-LiteSpeed-cache: miss. This is a special header that tells the browser that this content can be cached but is not currently cached. This is made clear by the missed response. The principle of caching is that the content is not cached the first time a page or article is visited. On the second visit, it is now directly in memory and is served by the much faster cache.
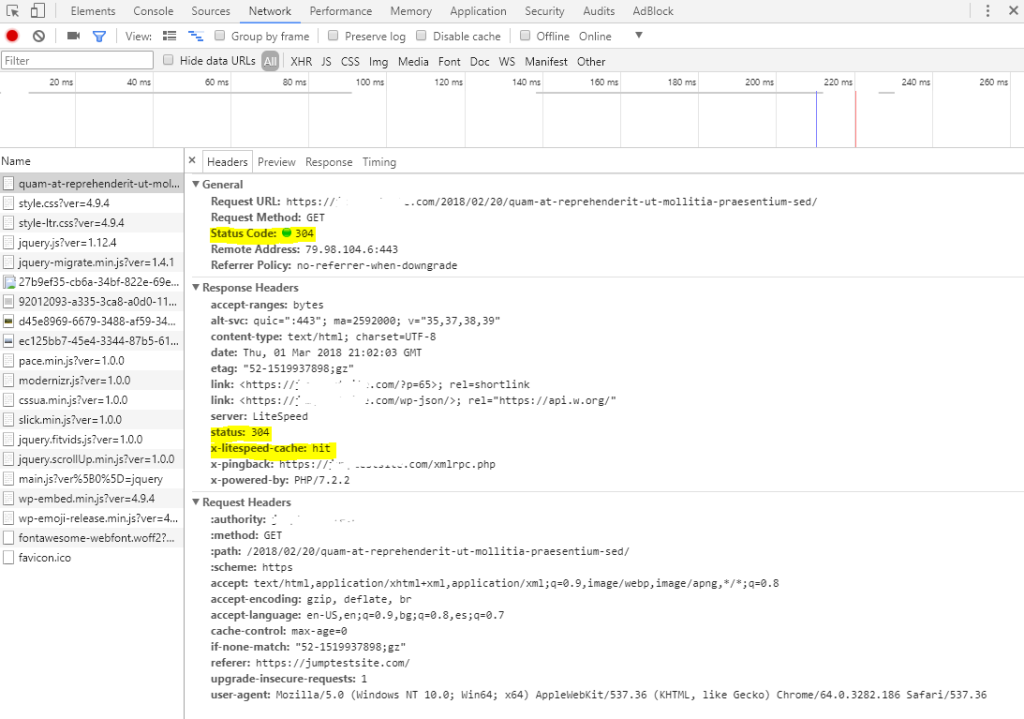
We don't have to close our developer console. We can reload the page and then repeat the same steps to track the server response. On the next reload, we now see a completely different response.
Here the server response is no longer 200 OK, but 304 Not Modified. This status means that the server doesn't need to retransmit the content, as this has already been done by the client (your browser). The client already has a copy available and can use it.
As you can see, this is a great speed advantage because it saves additional time when processing PHP requests, which are time-consuming in themselves. PHP is a language that is compiled in the moment, not upfront and one-time.
In the response, we also see a header x-LiteSpeed-cache: hit. This proves that the content is now actually being delivered by LiteSpeed Cache.
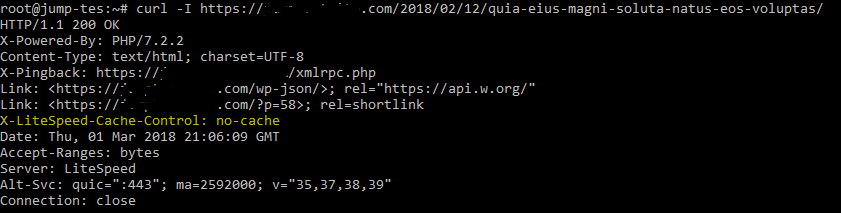
For lovers of Linux distributions, we have prepared a simpler test with the Curl tool. Let us open our terminal and run the command curl -I https://yourwebsite.com.
In this example, https://yourwebsite.com is only used as an example. Here we see the content in the X-LiteSpeed cache control response: no-cache. This means that the address is not yet saved in the cache.
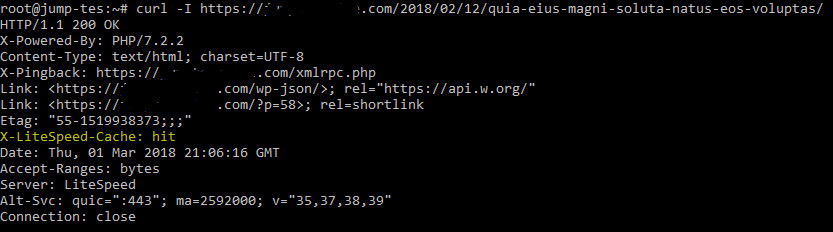
After a retest, when our content is cached by the browser, we see a response for X-LiteSpeed cache: hit. This shows that our cache is working correctly and without problems.
In the examples and tests, we have used pure WordPress without any added plugins, except for the caching plugins, which we have explicitly mentioned. We have used a lightweight free template (template name: Writee). We also randomly generate articles, photos, tags, etc.
The actual performance of your website can be greatly affected by various plugins, and some are extremely greedy for server resources. If you aren't getting good results after implementing the recommendations shown here, feel free to email us at support@jump.bg or submit a request in your client area.
We'll be happy to carry out an analysis and let you know which "greedy" plugins you're using. We'll also give you recommendations from our experience on which other plugins you could replace them with to improve the speed of your website.